
Advanced Generation: Tune the Engine, Then Edit the Mesh
By AirisJus · Published
A walkthrough of the Advanced Generation dashboard — seed, mesh quality, texture resolution, parts separation — and what parts separation unlocks for designers, manufacturers, and animators.

Two paths through FurniMesh
The homepage generator at /image-to-3d/ is built for speed. You drop a photo, you wait 45-60 seconds, you get a model. For most uses — quick prototypes, exploratory work, ad-hoc 3D for a design review — that's the right tool.
Advanced Generation is the other path. Same engine underneath, four extra control surfaces, and a mesh editor for after the generation finishes. For production-grade output, for repeatable A/B testing of different mesh qualities, for any workflow where you'll touch the model in Blender or SketchUp afterwards, Advanced is where you live.
The four levers
1. Seed
The seed is the random-number value the engine uses to make non-deterministic choices during generation. With the same input photo and the same seed, you get the same mesh every time. Different seeds produce subtly different geometric interpretations of the same input.
Two reasons to care:
- Reproducibility. You found a mesh you like. You want to go back to it next month after testing alternatives. Save the seed.
- A/B testing. Generate the same chair with seeds 1 through 5. Pick the best one. The variation is small but sometimes one seed handles a tricky shape (a curved armrest, a tufted cushion) better than the others.
2. Mesh quality
Four tiers: Low / Standard / High / Ultra. The difference is polygon budget and processing time.
- Low — fast, cheap on credits, good for thumbnails and previews. ~5k polygons.
- Standard — the default. Suitable for web display, AR, and most renderers. ~15k polygons.
- High — for close-up renders, photogrammetry-style assets, and rigging. ~40k polygons.
- Ultra — production-grade for marketing renders and high-end visualization. ~100k polygons.
The honest answer on quality: jump from Low to Standard is huge. Standard to High is meaningful for close-ups. High to Ultra is mostly diminishing returns unless you're doing extreme close-ups or you specifically need denser topology for sculpting/animation.
3. Texture resolution
1024p or 1536p per texture map. The number is the side length of each texture (so 1536p is ~2.25× the pixel data of 1024p).
When 1536p is worth the extra credits:
- AR placement (the user's face is close to the virtual object)
- Marketing renders shot at 4K or higher
- Any workflow where the camera gets within a meter of the model
When 1024p is fine:
- Web product pages (the viewer rarely zooms in past 50%)
- Configurators (textures often get swapped at runtime anyway)
- Thumbnails and previews
4. Parts separation
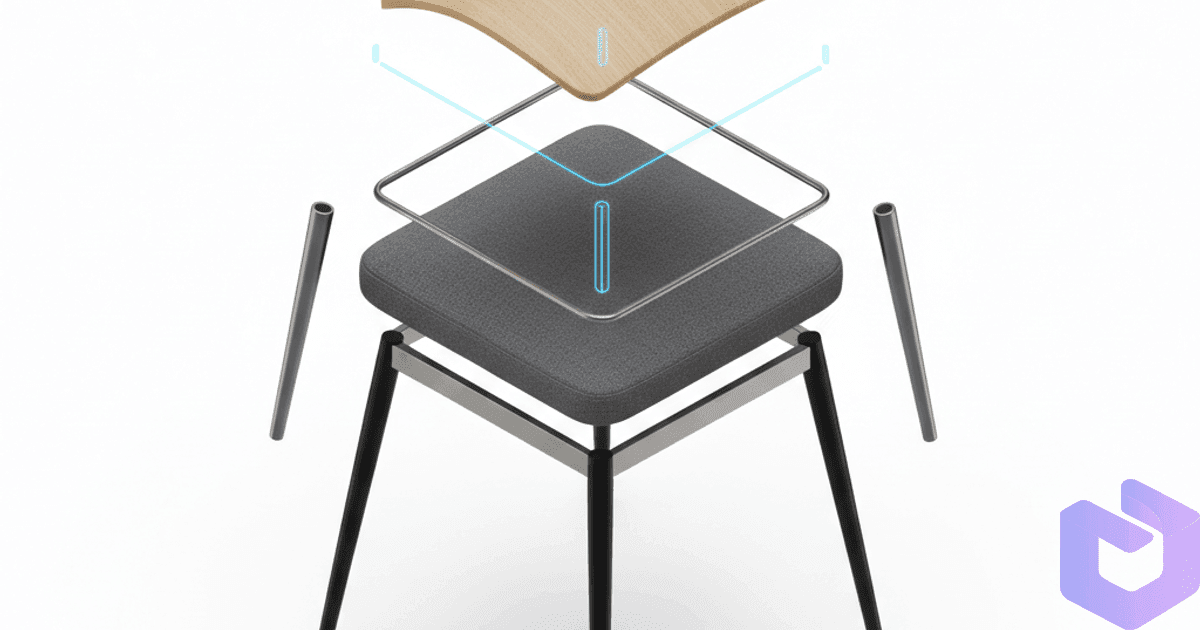
This is the marquee lever. With parts separation on, the engine doesn't output a single fused mesh — it outputs the model as separate components (cushion, frame, legs, backrest), each with its own geometry and materials.
This unlocks things a fused mesh can't:
- Selective editing. Delete the back cushion if you only want the frame.
- Per-part materials. Swap the seat fabric in your renderer without re-generating.
- Multi-material exports. GLB and BLEND preserve the part boundaries; downstream tools see them as separate objects.
- Rig-ready output. Animators get logical joint boundaries (where the cushion meets the frame, where the legs attach) without manual cleanup.
The walkthrough
Open the dashboard
Navigate to /dashboard/advanced-generation. Your remaining credits show at the top.
Upload your photo
Drag-and-drop or browse. The Nano Banana enhancement runs in the background — you don't toggle it on, it just happens.
Set your four levers
Pick a seed (or accept the random default). Pick mesh quality (Standard is the right default unless you have a specific reason to upgrade). Pick texture resolution. Toggle parts separation on if you'll do any post-gen editing.
Generate
Click Generate. The pipeline takes 60-120 seconds depending on settings. Higher quality and parts separation both add time.
Edit in the in-editor
After generation, the model loads in the editor. Click individual parts to highlight them. Delete unwanted elements (a footrest you don't need, a back cushion that came out wrong). The deletion is non-destructive — you can re-add parts from the original output.
Save and download
When the mesh looks right, save. Then download in whatever format you need: GLB, OBJ, SKP, BLEND.
When parts separation actually changes the workflow
Concrete examples from our paid user base.
Designers building configurators. A sofa with three fabric options. Without parts separation, you'd generate the sofa three times — once per fabric. With parts separation, you generate once and swap the seat-cushion material at runtime in your viewer.
Manufacturers preparing CAM pipelines. A chair where the frame is wood and the seat is upholstery. The CAM software needs them as separate exports for different machines. Parts separation gives you that for free; a fused mesh would require manual splitting in Blender.
Animators rigging furniture for product video. A reclining chair needs joint boundaries where the back meets the seat. Parts separation puts logical cuts in the right places. Hand-rigging a fused mesh takes hours; rigging a parts-separated mesh takes minutes.
Try Advanced Generation → upload a photo, tune the settings, edit the mesh
Another high-quality example
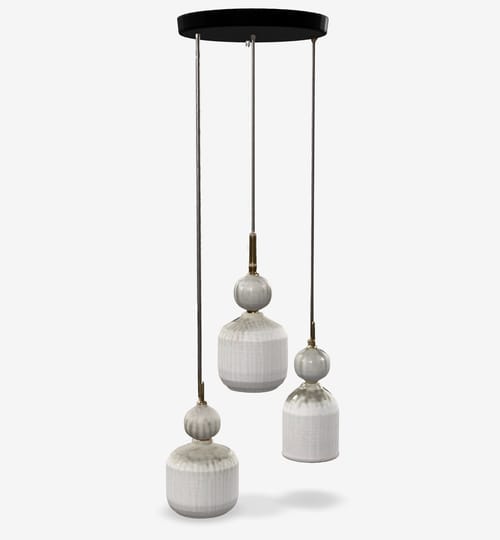
This one is a representative Ultra-quality output: ~100k polygons, 1536p textures, parts separation on. It's overkill for a thumbnail. It's exactly right for a product page where the customer can zoom and rotate.
Cost / credit math
Advanced Generation runs on the same credit pool as standard generation. Higher quality tiers cost proportionally more credits per generation:
- Low: 1× the base cost
- Standard: 2×
- High: 4×
- Ultra: 8×
Texture resolution is additive: 1536p doubles the texture-baking step (~30% of total cost). Parts separation adds ~20% to total time and a small credit premium.
In practice, an Ultra + 1536p + parts-separated generation costs roughly 10-12× a Low/1024p/fused one. If you generate dozens of models a day, the cost difference matters; if you generate a few high-quality models a week, it doesn't.
What this doesn't replace
Advanced Generation gets you to a production-grade mesh faster than any other tool we're aware of. It doesn't replace Blender for serious modeling, doesn't replace Substance for serious material work, and doesn't replace a human technical artist for final cleanup.
What it does replace: the first 8-20 hours of "block out the mesh, UV-unwrap it, bake materials." You start from a finished mesh and spend your time on the work that actually requires judgment.
Open Advanced Generation →
If you need to upgrade first, see plan options.
More Articles
Revolutionary Image to 3D with Parts Separation - Advanced Generation Technology
Discover FurniMesh's breakthrough advanced AI technology that transforms single images into superior quality 3D models with intelligent parts separation for professional workflows.
July 18, 2025
Engine V2: How Our New 3D Pipeline Renders Curves, Glass, and Fine Detail
The April 2026 V2 engine release is the biggest geometry upgrade in FurniMesh's history. Sharper textures, smarter mesh topology, and complex shapes that used to be failure cases now render cleanly.
April 10, 2026
Phone-Photo to Studio Render: How Google Nano Banana Pre-Processes Every Upload
Most furniture photos are bad — bad lighting, cluttered backgrounds, off-angle. We added Google's Nano Banana model as a pre-processing step to fix that before the 3D engine ever sees the image.
May 12, 2026