FurniMesh V2 Generation Pipeline — Complete Guide to Advanced Generation
Full walkthrough of FurniMesh's V2 advanced generation pipeline — three-stage diffusion, multi-view input, every parameter explained, and the in-browser mask editor for fixing small mistakes without re-generating.
Advanced Generation gives you direct control over every stage of FurniMesh's V2 pipeline — the same engine that powers our public library, with no presets hiding behind it. This guide walks you through every setting, when to use it, and how to use the in-browser mask editor to fix small imperfections without re-generating the whole model.
If you'd rather skip ahead, try it now in your dashboard.
How the V2 pipeline works
FurniMesh V2 is a three-stage diffusion pipeline that turns photos into a textured 3D model:
- Sparse Structure — interprets your image(s) and lays out the rough volume of the object in 3D space.
- Shape — refines that volume into a clean polygon mesh with accurate surface detail.
- Material — projects the input image's textures onto the mesh and synthesizes the missing sides.
Each stage has its own diffusion sampler with four parameters you can tune. Most users will never need to touch these — the Standard preset works for ~80% of furniture pieces. But when results are unsatisfactory, advanced settings are the difference between a good model and a great one.
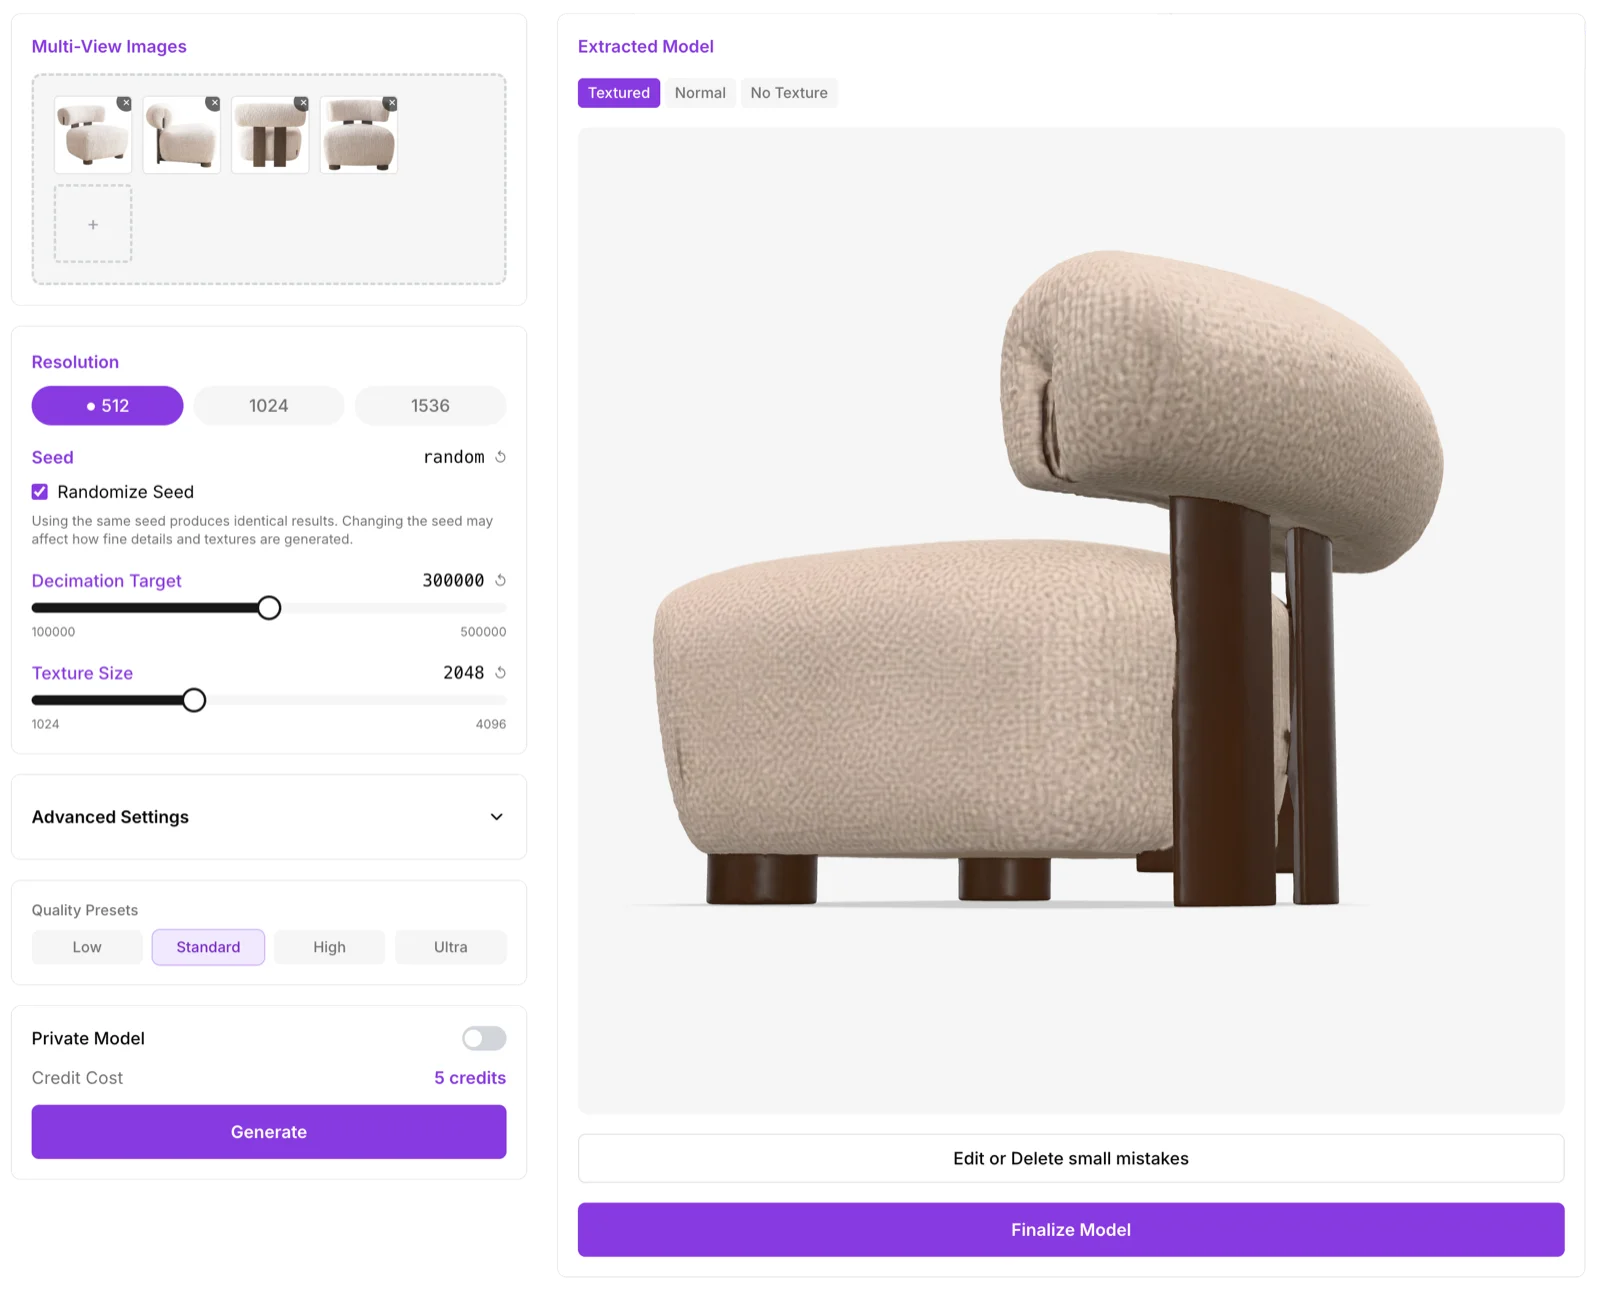
The main settings
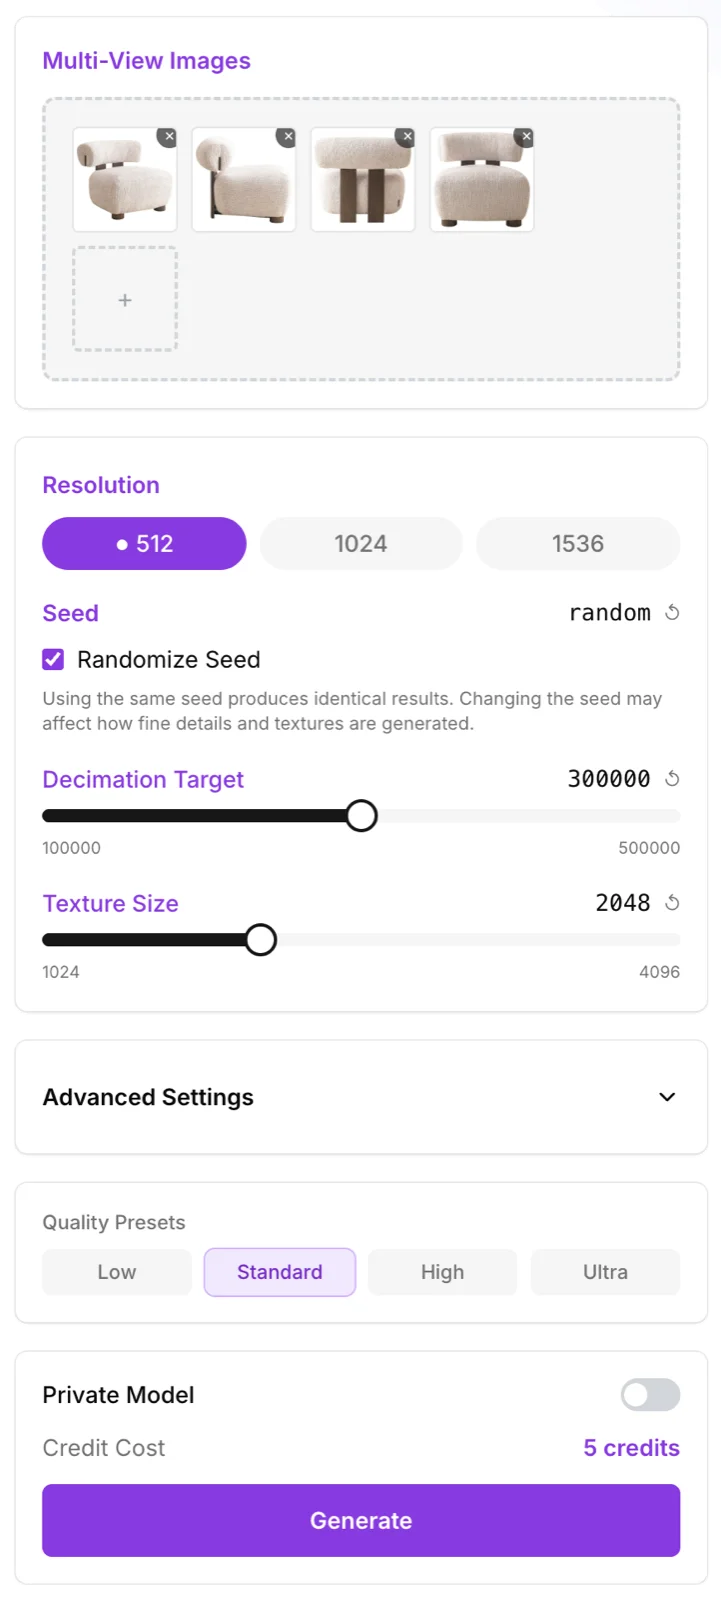
Multi-View Images
The single biggest quality lever in V2 is uploading multiple photos of the same object from different angles. The pipeline fuses what it sees across views before any 3D reconstruction starts, which dramatically reduces "guessed" geometry on the back of the object.
When to upload multiple views:
- The object has detailed surfaces on every side (sculpted chairs, sofas with carved backs, decorative tables).
- The front view alone hides important geometry (back legs, deep cushions, joinery).
- You have access to even two or three angles — drag them all in and let V2 fuse them.
A single front view will work, but if you have more photos, use them.
Resolution
Three options control how detailed the underlying generation grid is:
- 512 — faster, lower-poly. Use for quick iteration, simple geometry, or web previews.
- 1024 — balanced. Works for most furniture pieces.
- 1536 — maximum detail. Use for ornate furniture, sculpted surfaces, and hero renders.
Higher resolution costs more compute time but produces more accurate surface detail.
Seed
The seed is the random number that initializes the diffusion process. Same seed + same image + same parameters = identical model every time. Useful for:
- Reproducing a result you liked.
- A/B testing parameters — fix the seed, change one setting, compare the difference.
Leave "Randomize Seed" checked unless you need reproducibility.
Decimation Target
Sets the target polygon count for the output mesh. Range: 100,000 to 500,000 faces. Default: 300,000.
- Lower (100K–200K) — lightweight model for web, real-time rendering, AR.
- Default (300K) — balanced for most uses.
- Higher (400K–500K) — print-ready, archviz, close-up renders.
The mesh is generated at high density then decimated to your target. Lower decimation preserves more detail; higher decimation reduces file size.
Texture Size
Output texture resolution, 1024 to 4096. Default: 2048.
- 1024 — small file size, fine for distant views.
- 2048 — recommended for most use cases.
- 4096 — close-up renders, hero shots, fabric detail.
Texture size quadruples memory per doubling (1024 → 2048 = 4× memory). 2048 is plenty for almost everything.
Private Model
Toggle to keep your model private. Public models contribute to the FurniMesh library and earn you visibility; private models are only visible to you. Cost is the same either way.
Quality Presets
Four one-click presets that snap all advanced parameters to known-good values:
- Low — fastest, lowest quality. Quick rough-shape previews.
- Standard (default) — the recommended starting point. Works for ~80% of furniture pieces.
- High — more sampling steps and higher guidance for finer detail.
- Ultra — maximum sampling on every stage. Use when Standard misses subtle geometry on ornate pieces.
When you change any individual advanced parameter, the preset automatically switches to Custom.
Advanced Settings — when Standard isn't enough
Click "Advanced Settings" to expand the full parameter grid:
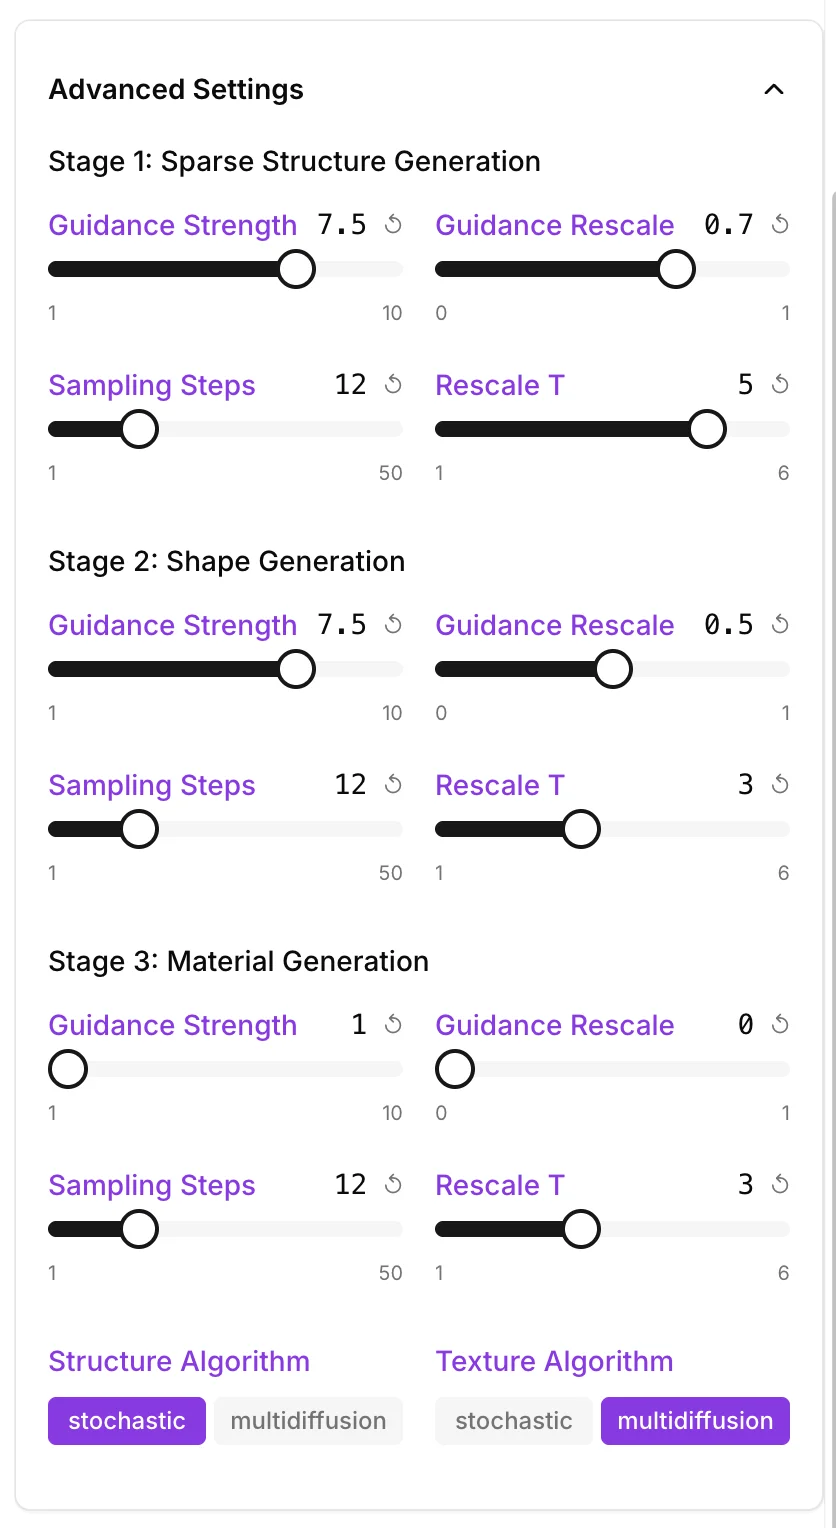
Each of the three stages exposes the same four parameters. The defaults are stage-specific — Material has lower guidance because textures are noisier than geometry.
Per-stage parameters
Guidance Strength (1–10) — how strongly the model adheres to your input image.
- Higher = stays closer to the input, more literal, less creative fill.
- Lower = more synthesis, can introduce detail not visible in the photo.
- Defaults: 7.5 (Sparse Structure & Shape), 1 (Material).
- Push Sparse Structure & Shape to 9–10 if results drift away from the photo; lower Material to 0.5 if the texture looks over-baked or saturated.
Guidance Rescale (0–1) — a stabilizer that prevents over-strong guidance from collapsing detail.
- 0 = no rescale, raw guidance applied.
- 1 = full rescale, very stable but less responsive.
- Defaults: 0.7 (Sparse Structure), 0.5 (Shape), 0 (Material).
- Increase if you see flat areas or "melted" surfaces; decrease if results feel too smooth.
Sampling Steps (1–50) — number of diffusion denoising steps for this stage.
- Lower = faster, less refined.
- Higher = slower, sharper.
- Default: 12 across all stages.
- Bump to 20–30 for hero shots; quality improvement plateaus past 30.
Rescale T (1–6) — controls when in the sampling trajectory the rescale kicks in.
- Lower = rescale fires earlier, affects coarse structure.
- Higher = rescale fires later, affects fine detail.
- Defaults: 5 (Sparse Structure), 3 (Shape), 3 (Material).
- Most users never touch this — change in increments of 0.5 when you do.
Algorithm choices
Structure Algorithm:
- stochastic (default) — better for novel objects, more variation. Use this for unique pieces or one-off references.
- multidiffusion — better for objects similar to common training data (standard chairs, tables, sofas). More stable, less creative.
Texture Algorithm:
- stochastic — better for solid colors and simple materials.
- multidiffusion (default) — better for complex patterns, fabrics, and busy textures.
If your output looks plasticky or solid where the input was textured, try switching Texture Algorithm to stochastic.
Generation in progress
After you hit Generate, you'll see a live status indicator while all three stages run sequentially:

Total time depends on resolution, sampling steps, and texture size. Expect 30–90 seconds for default settings; longer for Ultra preset or 1536 resolution.
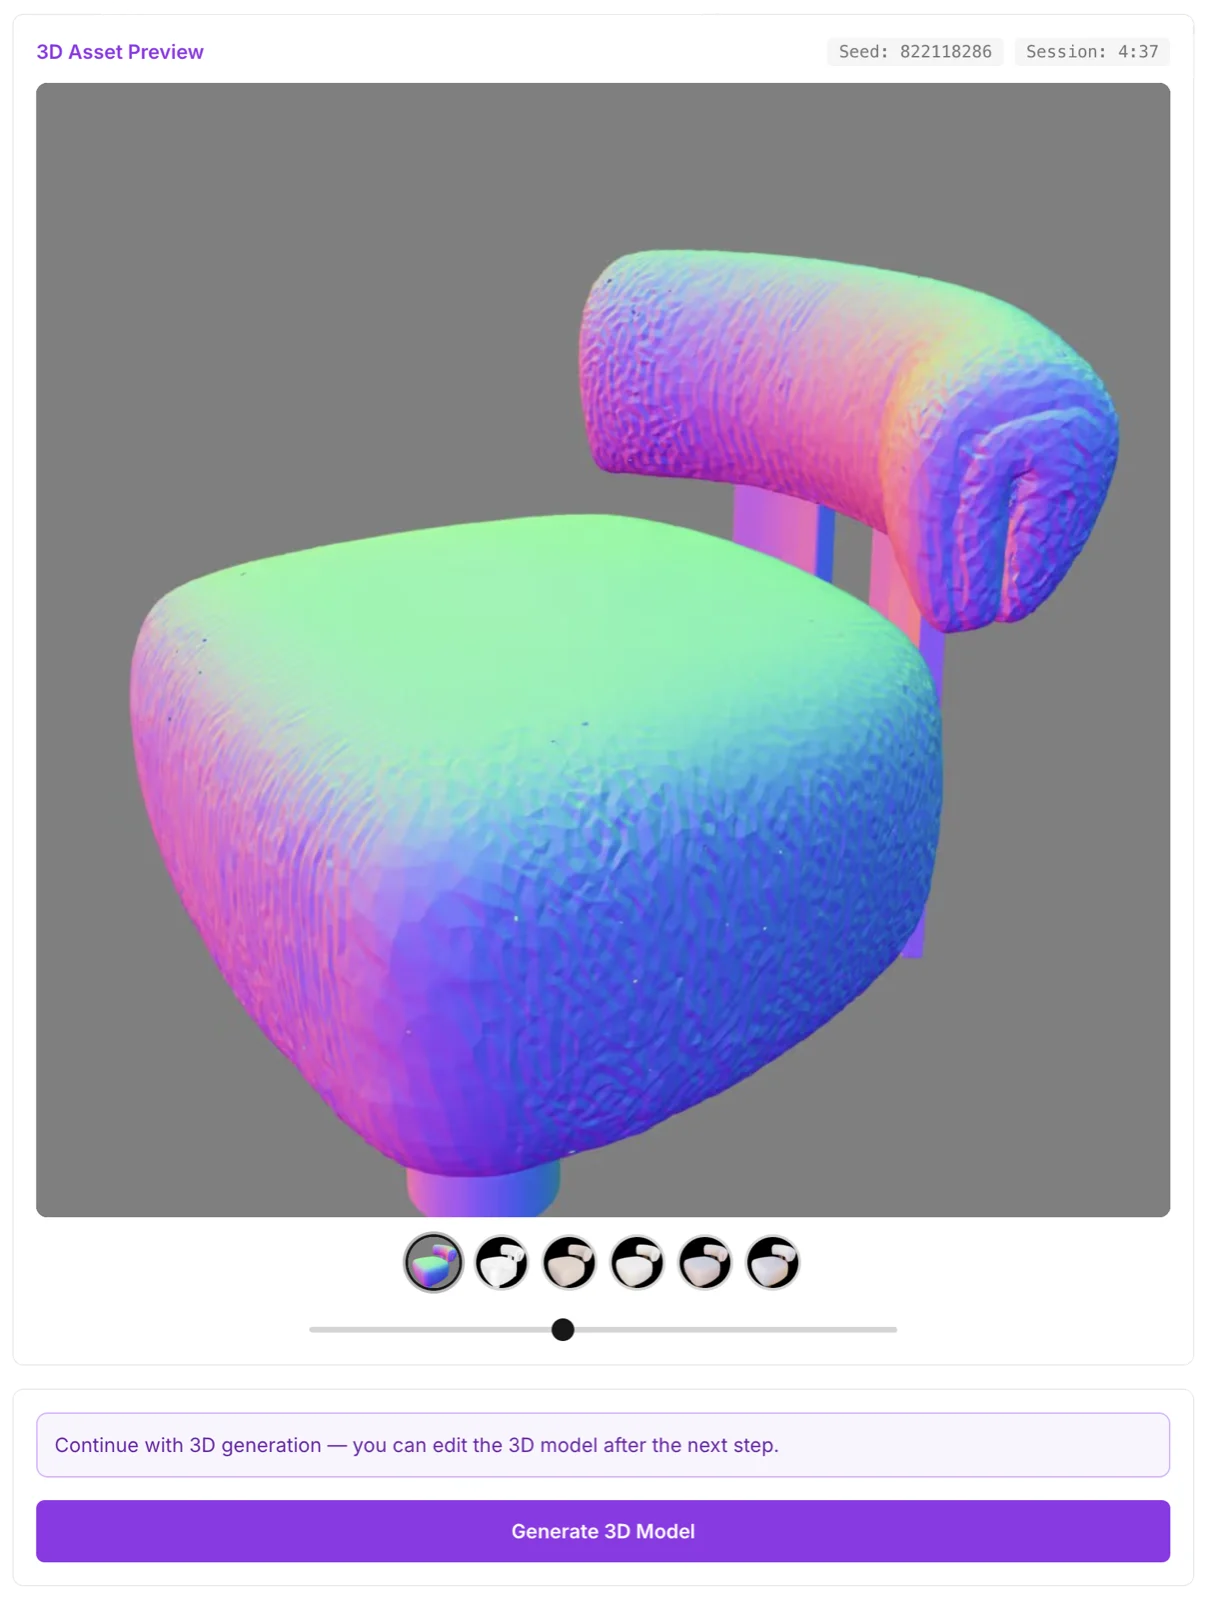
Inspecting your generated model
Once generation completes, the preview viewer opens. You can rotate, zoom, and orbit:
Three view modes are available:
- Textured — the final model with synthesized materials.
- Normal — surface normals coloring. Useful for spotting geometry issues (waves, dents, missing surfaces).
- No Texture — bare mesh, easiest way to see polygon flow.
Use the Normal view first — texture can hide small dents, holes, and dimples that you can fix with the mask editor:
Here's the same model back in Textured view, ready for final inspection:
Fixing small mistakes — the mask editor
If you spot a defect — a phantom bump, material bleed onto the wrong surface, a missing leg — you don't need to regenerate the whole model. The in-browser mask editor lets you paint over the problem area and re-synthesize only that region.
Step 1: Open the mask editor
Click Edit Small Mistakes on the model preview:

Step 2: Paint over the defect
The mask editor opens. Rotate the model to face the defect, then paint white over the area you want to fix:
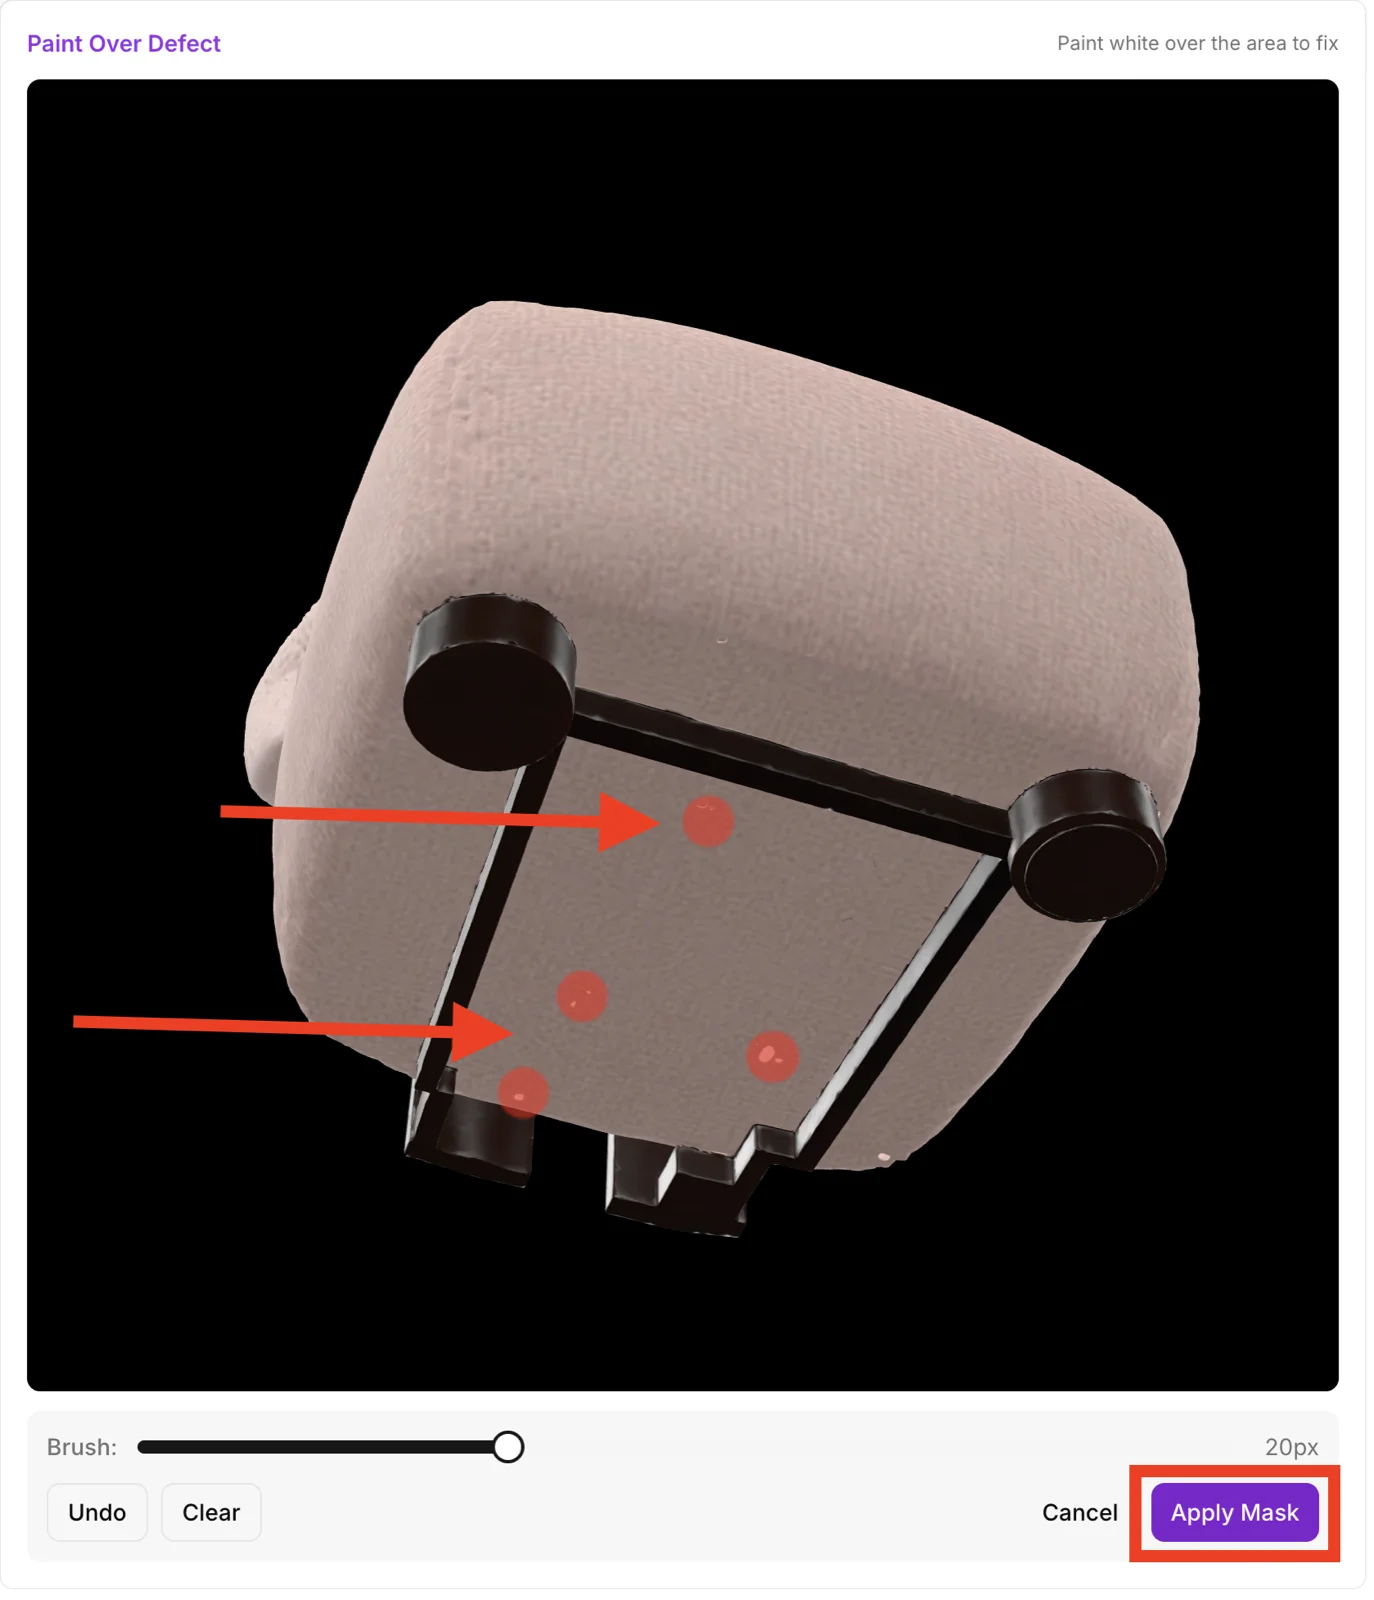
- Use a small brush (5–10 px) for fine fixes like material bleed.
- Use a larger brush (20–40 px) for larger geometric defects.
- Undo removes the last stroke; Clear resets the whole mask.
- Click Apply Mask when the painted area covers the defect.
Step 3: Apply the fix or delete the area
After applying the mask, you have two options:
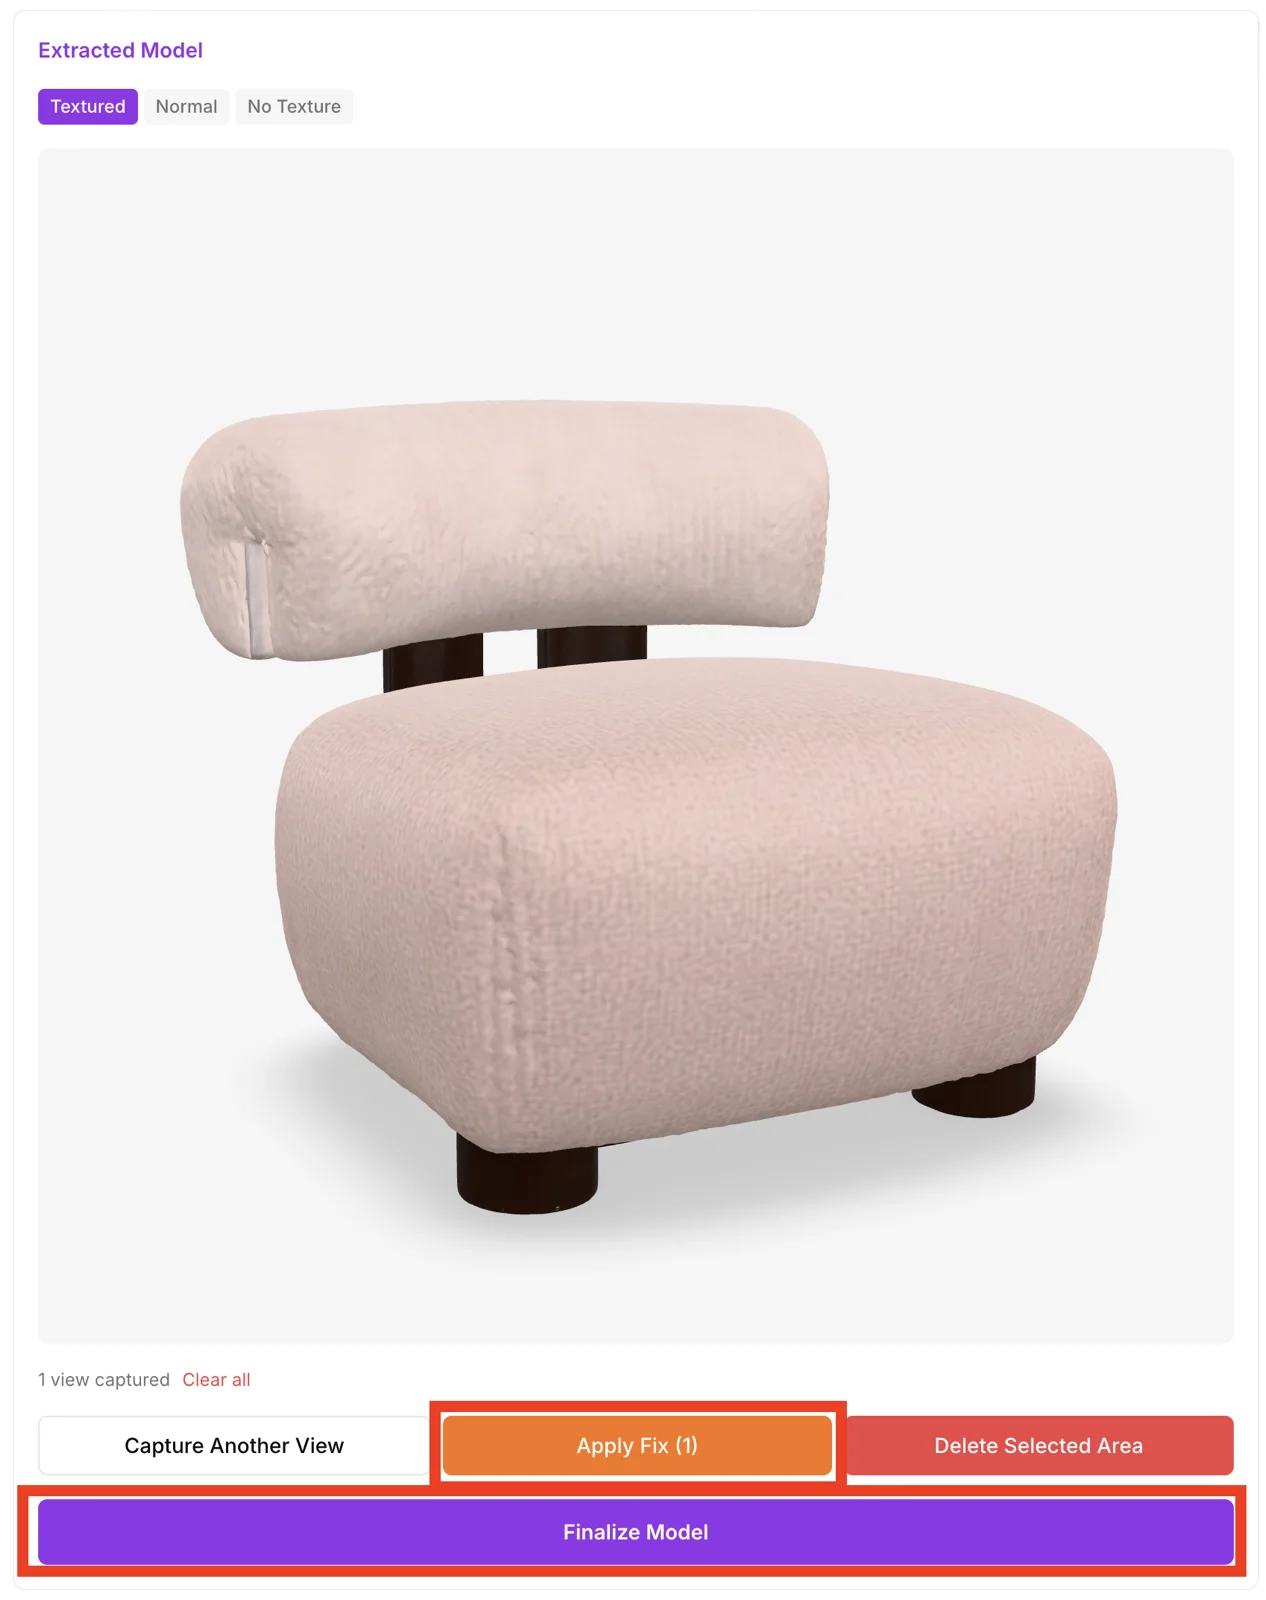
- Apply Fix — re-runs the pipeline on just the masked region, re-synthesizing geometry and texture. Best for material bleeds, phantom bumps, small bridge faces.
- Delete Selected Area — removes the polygons under the mask entirely. Best for floating fragments and clear garbage geometry that shouldn't be there.
You can also click Capture Another View to add a new photo angle and improve the synthesis on the masked region with extra context.
When you're satisfied, click Finalize Model.
Step 4: Done
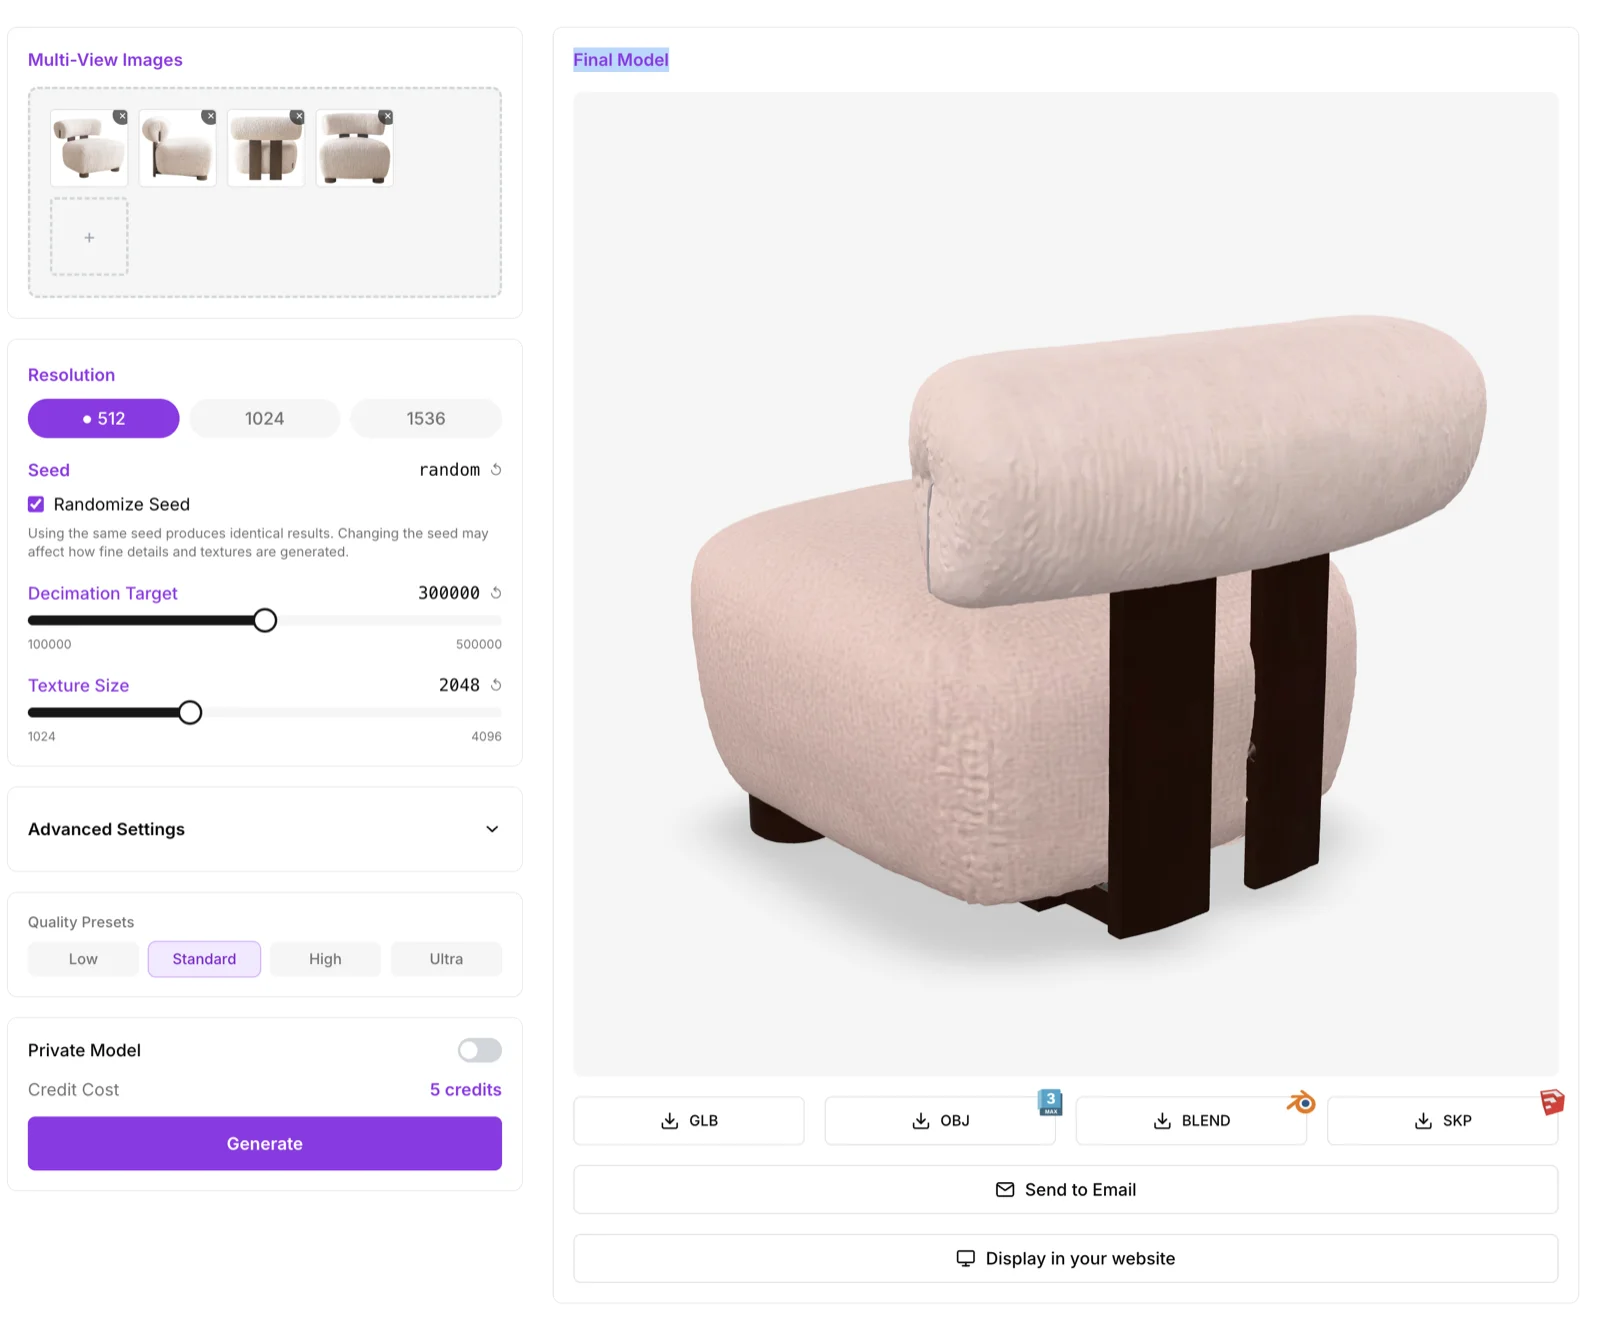
The finalized model lands in your library and is available for download in GLB, OBJ, SKP, and BLEND.
Tips for great results
- Start with the Standard preset. It works on 80% of furniture. Only touch advanced settings if Standard misses something.
- Upload multiple views whenever you can. Two angles is twice as good as one. Three is dramatically better than two.
- Use Normal view to spot defects. Texture hides small geometry issues that the mask editor can fix in 30 seconds.
- Iterate with a fixed seed. When tuning parameters, lock the seed so you can isolate what each change does.
- Don't over-tune Material. Most texture problems are solved by switching the Texture Algorithm or nudging Guidance Strength, not by aggressive parameter changes.
Ready to generate?
Advanced Generation is included with all Individual and Company subscriptions.